With the end of the year approaching, most companies find they have a rare opportunity to do some significant system maintenance as users go offline for the holidays. In addition to, say, upgrading to IBM i OS 7.4, this may also be a good opportunity to rearrange your Valence setup so it’s following a “best practice” configuration. In a proper setup you can download and test new Valence builds without affecting any of your production or test instances.

To clarify, when you downloaded Valence 5.2 or 5.2+ for the first time, a “base” Valence installation was created called VALENCE52. While this is a fully functional instance that you can log into at port 7052, it is recommended that you do NOT use this instance for production or testing. Instead you should create separate production and test instances for your users via the Instance Manager app.
The reason for this recommendation is simple: The VALENCE52 base instance is what gets updated each time you run the Valence installer to apply a new build, so it’s important to keep this instance idle so updates can be applied to it at any time without any impact to users. You can then roll out updates from your base Valence instance to other instances on a timeframe that is most convenient to you and your users.
If you’re already familiar with Instance Manager and your users are not logging into the base VALENCE52 instance, then congratulations! You can skip this tip and move on to more exciting reading. But if you’re currently using the VALENCE52 instance for production or testing and you’re ready to separate it into its own instance, read on.
For purposes of this write-up, we’ll assume you’re currently using VALENCE52 for production and would like to rename it to, say, VALENCE52P (if you choose to use a different name then adjust the instructions that follow accordingly). This process boils down to the following ten steps, which should take no more than a couple hours on most systems:
- Use Instance Manager to create a new instance for production, naming it VALENCE52P, with an IFS directory of valence-5.2p. Do not start the instance.
- Delete the newly created VALENCE52P library and valence-5.2p IFS directory.
- Rename your existing VALENCE52 library and valence-5.2 directory to VALENCE52P and valence-5.2p respectively.
- Delete the VALENCE52 instance in your HTTP admin page.
- Download the latest Valence build (if you haven’t already) and run it on your PC to get a “fresh” base instance (VALENCE52) on your system
- Delete the VVINST and VVINST1 objects in VALENCE52, then move the VVINST objects in VALENCE52P over to VALENCE52.
- If you have been using port 7052 to access production, change the VALENCE52 base instance to listen on a different port.
- Start the VALENCE52P instance and verify you can log in with the same URL you’d been using to log into the VALENCE52 instance.
- Verify all Portal Admin settings in your VALENCE52P instance point to VALENCE52P rather than VALENCE52.
- Update your VALENCE52P instance to the latest build.
Now let’s walk through these steps in more detail (note: be sure you’re logged in as QSECOFR or a user with sufficient authority to make these changes)…
(1) Use Instance Manager to create a new instance for production, naming it VALENCE52P, with an IFS directory of valence-5.2p. Do not start the instance.
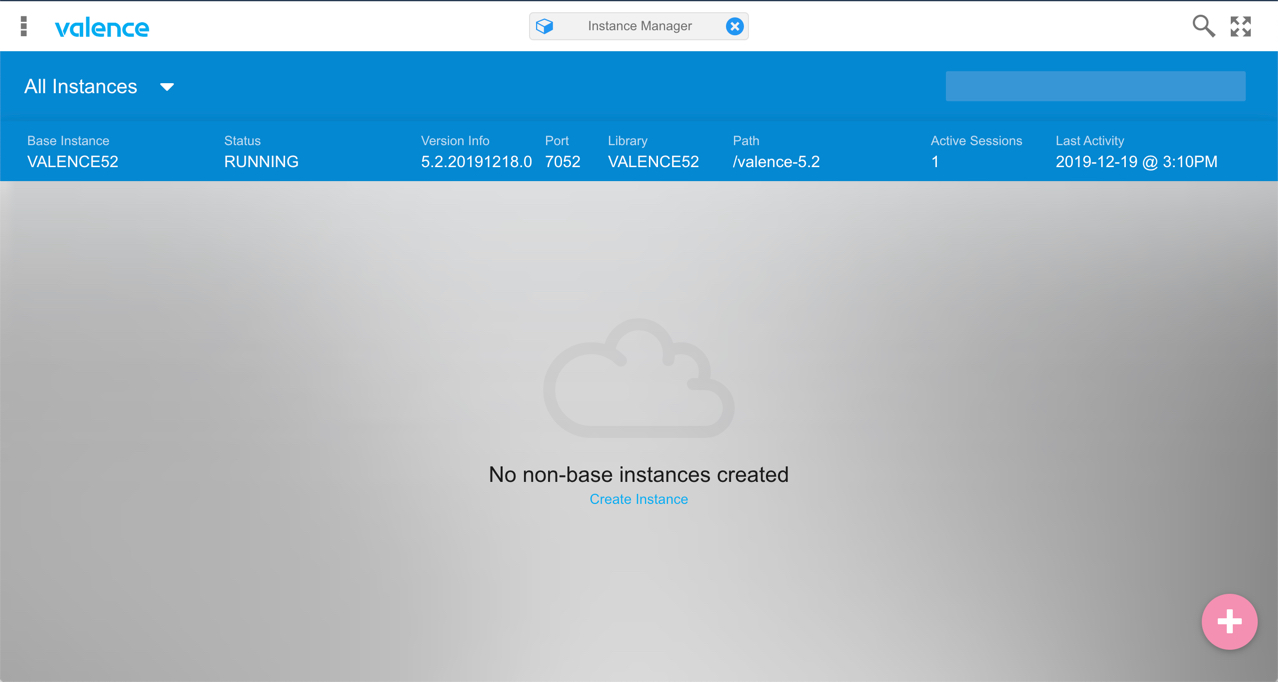
If you’re not already familiar with the Instance Manager app, have a quick look at the Valence Guide for a primer. In a nutshell, Instance Manger serves as a repository for all your Valence Instances and provides an easy way to create new instances. The base instance is listed in a bar across the top, with each additional instance listed as a tile below it. If you haven’t yet created any instances, you likely see a screen that looks like this:
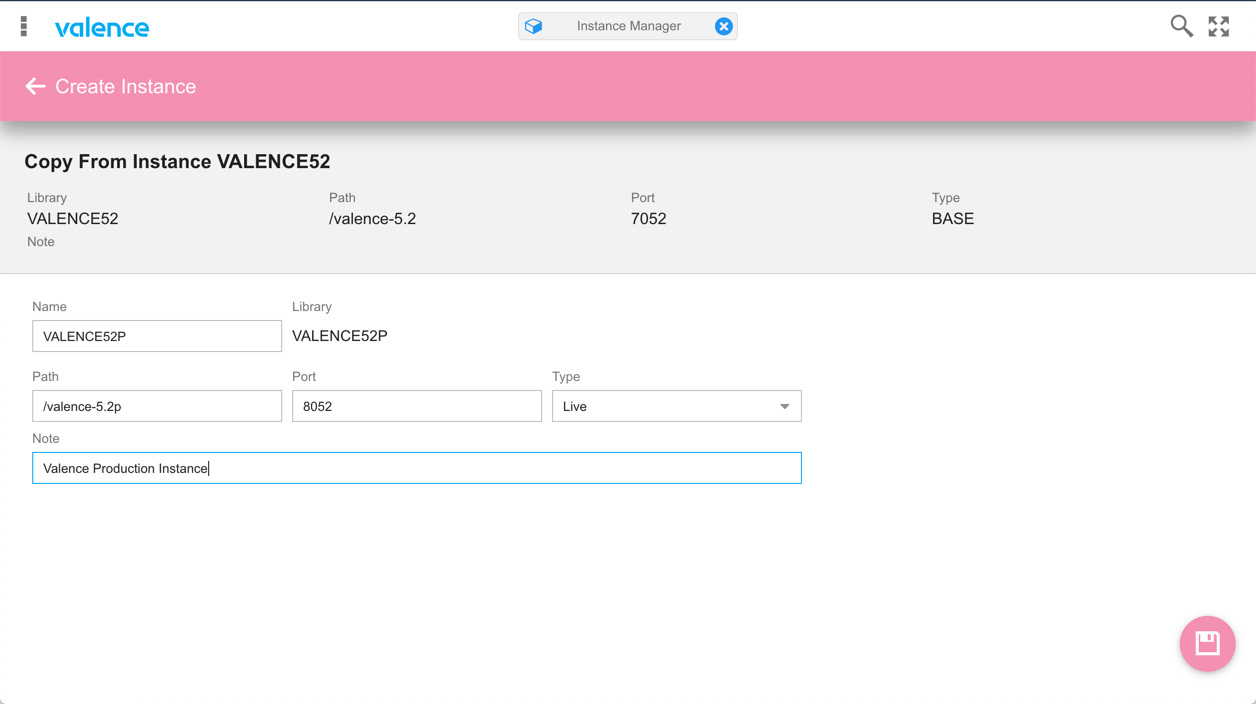
Click on the “Create Instance” link in the center of the page, or the pink Plus icon in the lower right, to make a copy of your base VALENCE52 instance. Fill in the new name (VALENCE52P), path (/valence-5.2p), a unique port (i.e., 8052), select an instance type (i.e., “Live”) and a note describing the instance. Then click the Save icon and Instance Manager will create a new instance for you.
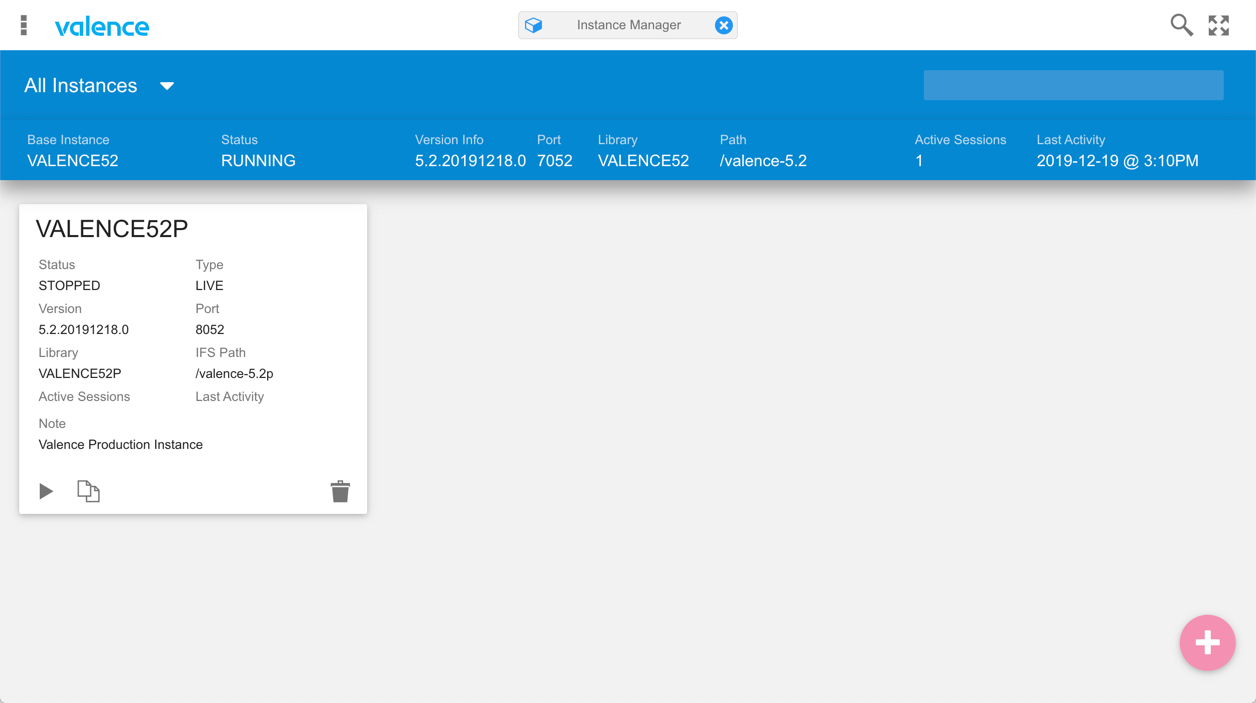
When the step completes, you’ll see a new tile representing the VALENCE52P instance. There is a triangular “Play” icon to start the instance, but do not start it up just yet.
(2) Delete the newly created VALENCE52P library and valence-5.2p IFS directory
Step (1) created an Apache instance as well as the VALENCE52P library and valence-5.2p IFS folder. Now we’re going to replace the library and folder with your former VALENCE52 instance. Issue the following from a command line:
DLTLIB VALENCE52P RMVDIR DIR('/valence-5.2p') SUBTREE(*ALL)
Note: there are roughly 34,000 “links” to be deleted in the RMVDIR step.
(3) Rename your existing VALENCE52 library and valence-5.2 directory to VALENCE52P and valence-5.2p respectively
Now we’re going to replace the former VALENCE52P library and valence-5.2p folders with the original base instance library and folder you were using in production. Issue the following commands, which will stop the VALENCE52 instance and rename its objects accordingly:
ENDTCPSVR SERVER(*HTTP) HTTPSVR(VALENCE52) RNMOBJ OBJ(QSYS/VALENCE52) OBJTYPE(*LIB) NEWOBJ(VALENCE52P) REN OBJ('/valence-5.2') NEWOBJ('valence-5.2p')
(4) Delete the VALENCE52 instance in your HTTP admin page
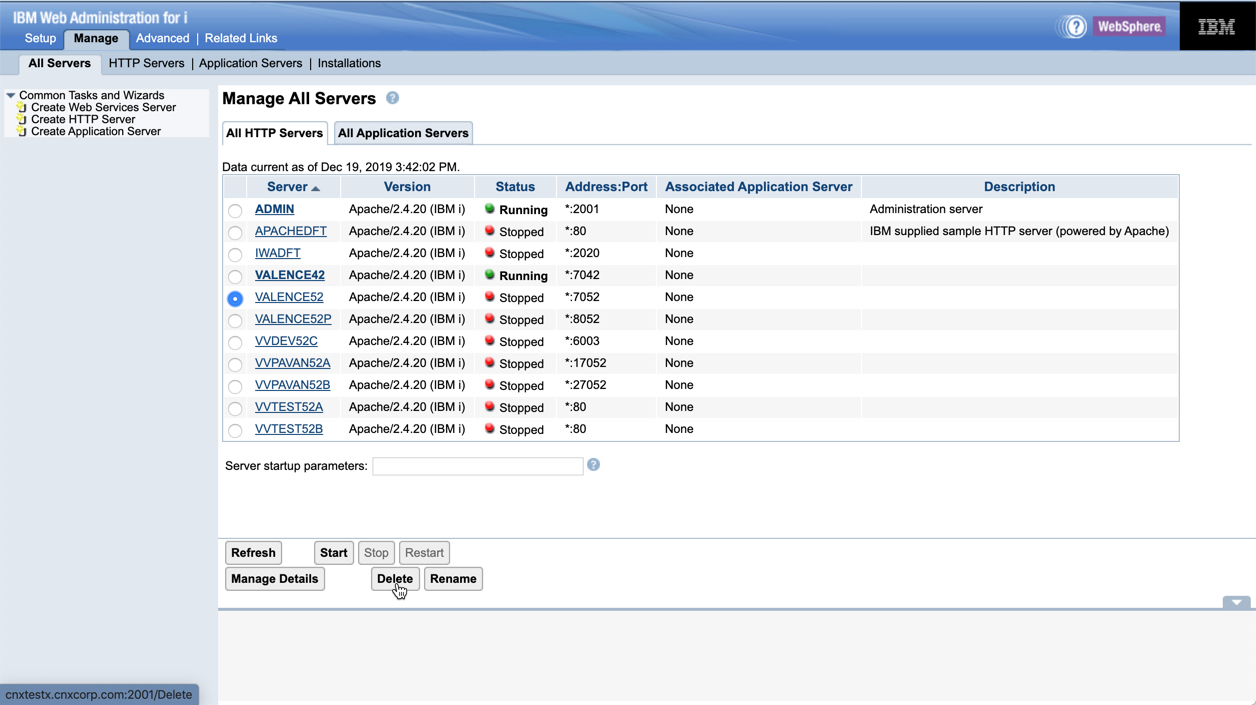
Using your browser, log into your HTTP Admin instance at http:1.1.1.1:2001/HTTPAdmin (replacing 1.1.1.1 with your IBM i system’s IP address). Click on the “Manage” tab up top, then in the “All Servers” sub-tab, select the VALENCE52 server instance and click Delete…
(5) Download the latest Valence build (if you haven’t already) and run it on your PC to get a “fresh” base instance (VALENCE52) on your system
You can get the latest Valence 5.2+ build here. Once this has run, you’ll see that a VALENCE52 instance has reappeared, along with its requisite library and IFS folder.
(6) Delete the VVINST and VVINST1 object in VALENCE52, then move the VVINST objects in VALENCE52P over to VALENCE52
The VVINST table is what Instance Manager uses to keep a list of all your Valence instances. It should only reside in the base instance, so we need to delete the one that was just created by the Valence install and replace it with the one currently in your VALENCE52P library, along with its associated indexes. Issue the following commands:
DLTF FILE(VALENCE52/VVINST1) DLTF FILE(VALENCE52/VVINST) MOVOBJ OBJ(VALENCE52P/VVINST1) OBJTYPE(*FILE) TOLIB(VALENCE52) MOVOBJ OBJ(VALENCE52P/VVINST) OBJTYPE(*FILE) TOLIB(VALENCE52)
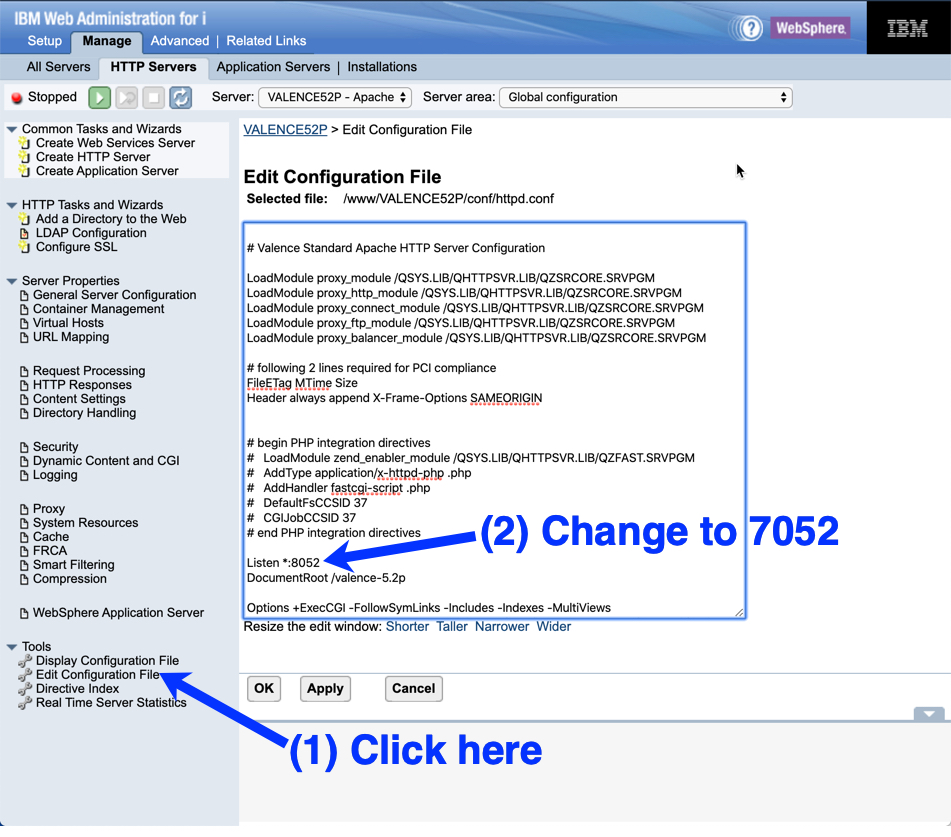
(7) If you have been using port 7052 to access production, change the VALENCE52 base instance to listen on a different port
If your users have the 7052 instance bookmarked to get to your production instance, you likely don’t want to have to tell them all to change that. So you’ll want to flip flop the port of your base instance with the port of your production instance. We find it’s easiest to do this by directly editing the configuration file for each instance, which you can do in the HTTP Admin page accessed in step (4).
First, navigate to the VALENCE52P instance by clicking on the “HTTP Servers” tab, select VALENCE52P from the “Server” drop-down list, then click on “Edit Configuration File” in the lower left. A couple dozen lines down you’ll see the following text:
Listen *:8052
Change “8052” to “7052” then hit OK.
Now select the VALENCE52 instance and change it’s listener from 7052 back to 8052 (or whatever the VALENCE52P instance was set to above).
You should also at some point update the ports inside the VALENCE52/VVINST file to match these port changes. You can use any file editing tool to do that (i.e., after step 8 below when the Valence instances are running again you could use Nitro File Editor).
(8) Start the VALENCE52P instance and verify you can log in with the same URL you’d been using to log into the VALENCE52 instance
If you still have the HTTP Admin page open, you can start VALENCE52P right there. Otherwise from a command line issue the following:
STRTCPSVR SERVER(*HTTP) HTTPSVR(VALENCE52P)
You can go ahead and restart the VALENCE52 instance as well.
(9) Verify all Portal Admin settings in your VALENCE52P instance point to VALENCE52P rather than VALENCE52
In your VALENCE52P instance (formerly VALENCE52), go into Portal Admin > Settings. Scroll down to the Portal Administration section and verify the “Show hidden settings” checkbox is checked. If it’s not, tick it and then hit Save. Next, use CTRL-F to search for VALENCE52 and change every instance to VALENCE52P. In similar fashion, search for valence-5.2 and change every instance to valence-5.2p. Then hit Save.
(10) Update your VALENCE52P instance to the latest build
Now that you have the latest build in your base instance, you can use Instance Manager to update the VALENCE52P instance, and any other instances you’ve created, to the latest and greatest (if they’re not on the latest build already). Log into the VALENCE52P instance (which may now be at port 8052) and launch Instance Manager, then stop the VALENCE52P instance by hitting the square “Stop” icon on its tile. Then hit the circular “Update” icon to bring it up to the latest build. When that process completes you can hit the triangular “Play” icon and users can log back in.

With these ten steps completed, you can rest assured that you now have an optimal setup for your Valence instances for 2020 and beyond.